Polishing woodturning projects. Which polish is best?
Every woodturner has a favourite polish but when you are starting out, the range of products on the market is quite bewildering - so where do you start?
- Removing rough grain, filling holes and cracks
- Sanding - all about abrasives
- Which is the best polish?
- Polishing with wax
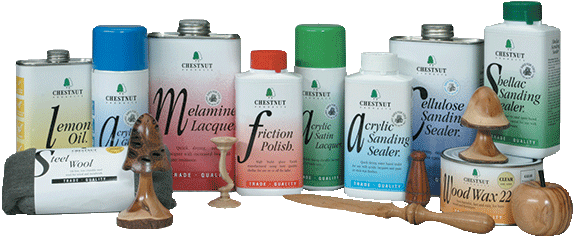
- Cellulose sealers, polishes, melamine
- Shellac based sealers and polishes. Friction polish
- Finishing oils. Danish oil. Food safe oil.
- Water based finishes. Acrylics
- Synthetics. Waterproof finish
Good preparation is vital
Rough or torn grain patchesYour turned object must be turned and sanded on the lathe to a smooth finish. Tool marks must be removed or the polish will show them up. Bruised or torn grain caused by incorrect tool technique will be particularly visible and cannot be hidden by sealer or polish.
If you have trouble with lifted grain, try holding the tool at different angles to obtain a shear cut to improve the finish. Try light cuts with a shear scraper held at around 45°. If your lathe will run in reverse try sanding the other way to lift the loose fibres and cut them away.
Repairing cracks
Large holes and cracks can be filled using stopper. Stoppers available are clay base like "Brummer" or Rustins, Cellulose, Wax, Shellac + rosin, Polyester or Epoxy Resin, or just a home made mixture of sawdust and glue. Try to guess what colour the wood will eventually darken or fade to and colour the stopping accordingly. You can colour stopping using Chestnut Spirit Stain. Filler looks unnatural if it is lighter in colour than the surrounding wood.
Fine cracks can often be quickly repaired with thin superglue which will run in by capillary action. Wider cracks can be filled with sawdust from the same wood sealed in with superglue.
If the wood is not quite dry then cracks will want to open up or close up later on, so filling the cracks with a rigid material can make things worse. Try keeping the piece in a plastic bag for 24 hours to see if the cracks close up.
You can test if a piece is dry enough by putting it in a bag with a hygrometer. Leave the bag for a few hours in the house. If the wood is still losing moisture to the environment the hygrometer will show an increase in humidity in the bag.
If you are not sure if your wood blank is seasoned properly it should be rough turned first to almost the final dimensions and kept (protected from splitting by wrapping in newspaper) in a warm dry room until the wood has settled down a bit.
Grainfilling
Grain filler is sealer thickened with chalk or similar fine powder. The idea is to fill the pores of coarse grained wood such as oak. This is optional and can be dispensed with if the grain is fine or if you prefer the natural texture of the wood.
Sealer
Coarse grain or absorbent wood will benefit from an initial coat of sealer. This will provide a quick build-up of "basecoat" which fills the grain to some extent and prevents the final coats of polish (the "topcoat") from sinking in. The sealer, when dry, will need light sanding or burnishing (known in the trade as "de-nibbing") to produce a super smooth surface ideal for the application of the polish. "Sanding sealer" is sealer specially made to "de-nib" easily.
The sealer should be chemically compatible with the polish which goes on top of it. For example you should choose cellulose sanding sealer to go under a melamine topcoat or acrylic sanding sealer to apply under acrylic gloss. Manufacturers produce "systems" of basecoat and topcoat which are guaranteed to be compatible. Incompatible layers of polish may not bond properly and will look slightly "milky". I have seen an acrylic finish flake off a coat of cellulose after a year or three, especially in the presence of damp.
Very fine grain wood may not need any sealer and polish can be applied to the bare wood.