Sanding woodturning projects. Which abrasive or sandpaper is best?
Every woodturner has a favourite finishing method but when you are starting out, the range of products on the market is quite bewildering - so where do you start?
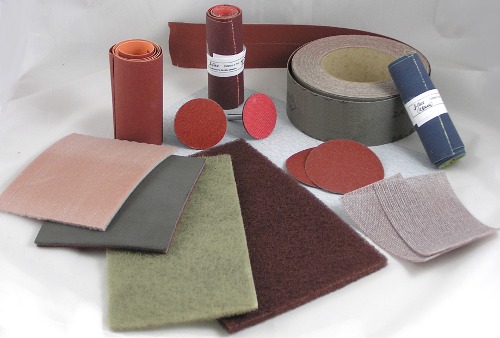
Flexible sanding cloth
 Sandpaper is, of course, a misnomer because most modern abrasive products contain neither paper nor sand. Most woodturners use aluminium oxide abrasive grit bonded to a cloth or mesh backing.
Cloth backing is better than paper backing as it is longer lasting and more flexible. Look for the word "flex" on the back - an example is Hermes 346 J-Flex. This material has specially enhanced flexibility so that it can conform to intricate shapes on the lathe. Cloth abrasives are water resistant so can be washed to de-clog the grit. They can be stored without degrade in a damp shed. Cloth is durable and does not wear through to your fingers. It is supplied in rolls of various widths and lengths and can be torn very easily into handy size strips.
"Resin bonded" abrasive grit is very firmly attached and supported by a layer of resin usually red in colour. This makes the product very long lasting.
Stearated grit has a lubricating non-stick top coating. This makes it cooler cutting and resistant to clogging. Cooler cutting reduces the danger of heat cracks. Excessive heat from over enthusiastic sanding can dry the surface of the wood causing fine cracks to appear. Cracks are often seen on the "end grain" areas of bowls which have been sanded too heavily.
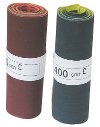
Grits used range from 60 down to as fine as 800 grit. The higher the number the finer the grit. 60 grit is very coarse and 800 grit is very fine. For most jobs you can start with 150 grit and work up through 180, 240 to 400. For fine grained wood such as yew go to 600 and polish with 1500 grit webrax or equivalent before you apply the finish.
Sandpaper is, of course, a misnomer because most modern abrasive products contain neither paper nor sand. Most woodturners use aluminium oxide abrasive grit bonded to a cloth or mesh backing.
Cloth backing is better than paper backing as it is longer lasting and more flexible. Look for the word "flex" on the back - an example is Hermes 346 J-Flex. This material has specially enhanced flexibility so that it can conform to intricate shapes on the lathe. Cloth abrasives are water resistant so can be washed to de-clog the grit. They can be stored without degrade in a damp shed. Cloth is durable and does not wear through to your fingers. It is supplied in rolls of various widths and lengths and can be torn very easily into handy size strips.
"Resin bonded" abrasive grit is very firmly attached and supported by a layer of resin usually red in colour. This makes the product very long lasting.
Stearated grit has a lubricating non-stick top coating. This makes it cooler cutting and resistant to clogging. Cooler cutting reduces the danger of heat cracks. Excessive heat from over enthusiastic sanding can dry the surface of the wood causing fine cracks to appear. Cracks are often seen on the "end grain" areas of bowls which have been sanded too heavily.
Grits used range from 60 down to as fine as 800 grit. The higher the number the finer the grit. 60 grit is very coarse and 800 grit is very fine. For most jobs you can start with 150 grit and work up through 180, 240 to 400. For fine grained wood such as yew go to 600 and polish with 1500 grit webrax or equivalent before you apply the finish.WEBRAX
is an abrasive mat of nylon filament similar to domestic pan scourers. This stuff is available in a range of grit sizes and is made with either silicon carbide (SiC) or Aluminium Oxide abrasive. It is very flexible and soft. The 1500 grit SiC Webrax is particularly useful for finishing on fine grain woods. It is very useful for rubbing down sealers and lacquers, "de-nibbing" as they say in the cabinet finishing trade. It can also be used for applying wax or for wet sanding. It is handy as a backing pad to keep your fingers from burning when using conventional abrasive paper.
MIRLON
This is a very similar product to the webrax above but is softer still. It is available in as fine as 2500 grit
ABRANET
This excellent and increasingly popular abrasive has grit bonded to a fine mesh which lets the dust fall through. It sticks to hook and loop backing pads and can be used with a vacuum system to suck dust away.
WIRE WOOL
is often used for de-nibbing or applying wax. Ask for the finest grade (0000). When using wire wool take care not to get it wrapped around the work. Use only small pieces at a time. Keep it away from naked flame or grinding sparks. Do not use it on oak as little particles of iron left in the grain will stain the wood. Wire wool is a little outmoded these days and being replaced by modern products such as the Webrax.
Safety tips when sanding
(1) When sanding always make sure your fingers are trailing rather than pushing against the direction of rotation or you risk injuring a finger. Take great care when sanding inside bowls and containers. When sanding spindle work you should hold the abrasive under the workpiece because the underside is the part which is rotating away from you. Alternatively you might prefer walking around to the rear of the lathe and sanding the top of the work which is then moving away from you.(2) Keep clear of sharp rotating edges, particularly bowl rims which can cut through your skin in a instant and give you a wound which takes weeks to heal.
(3) ALWAYS remove the tool rest before sanding or move it well away. (4) Wear a mask or powered respirator even if you are using a dust extractor. Most dust extractors should be called chip extractors because they just do not remove the fine (invisible) dust which is the most harmful to your lungs. If you have an extractor, position the nozzle so that it collects the most dust. Use a wide nozzle for spindle work.
(5) If you are using abrasive in strip form never give it a chance to get wrapped around the work. Never wrap abrasive strip (or anything else) around your fingers in such a way that the free end may get caught round the workpiece.
Using Abrasives
Once you have the best finish you can achieve with your turning tools you will need to get rid of tool marks with coarse abrasive. 120 or 150 grit should be coarse enough to start with unless you have badly torn grain. For sanding large areas or inside bowls tear up the abrasive into convenient size squares and fold into three. For sanding fine details you can tear narrow strips. Tearing strips is easy with cloth-backed abrasive. Use the strips in tension or wrap strips around a former to get into hollows in spindle turning. Formers can be scraps of wood, dowelling, pencils, pieces of leather or carpet or whatever comes to hand. Sanding inside bowls produces lots of heat which can burn your fingers. You can try using a wad of leather, wire wool, webrax or layers of old abrasive cloth between your fingers and the abrasive to save discomfort. You can glue pieces of abrasive cloth back to back, using double sided tape or leather adhesive, to reduce heat transmission and also to prevent the material from slipping away from under your fingers. Keep the abrasive ON THE MOVE. If you just press the abrasive stationary against the revolving wood it will quickly clog up with dust. The dust is trapped between the abrasive and the wood surface, halting the cutting action and causing unnecessary friction. Keeping the abrasive moving helps to make the cut more even, minimising the formation of sanding rings. When sanding inside bowls or on large areas, switch pressure from finger to finger as if you were trying to play the piano. This gives sanding dust a chance to escape. When using strips to sand spindle work, use a sawing motion, pulling the strip back and forth, again to release the dust as much as possible. Do not let the edge of the abrasive saw into the wood and mar your beads in spindle work Take care not to destroy the crisp appearance of the design by rounding over the details. You can avoid this by wrapping the abrasive around small pieces of card to help get into the awkward parts and clean up decorative turned mouldings. Small or delicate turned pieces generally require finer grades of abrasive than large pieces. Do not overheat the surface of the wood by over enthusiastic sanding. The heat can dry out the surface of the wood causing fine "heat cracks" If you think the surface is getting too hot, use a plant mister spray to damp it a bit and cool it. If you are getting problems with clogging or heat cracks try Jayflex'S' which has a lubricating anti-clog coating. Have a brush handy and use it frequently to sweep the dust off the abrasive. Otherwise a build up of dust will reduce cutting performance and friction will cause heat cracks. Sand thoroughly going through the grades to at least as fine as 320. Even this grit will give "turning rings" caused by the lathe rotation not being in line with the grain. To get rid of turning rings, stop the lathe and hand-rub, in line with the grain. Your few seconds of elbow grease will be amply repaid. If that is not good enough you can get almost a polished surface by burnishing with 1500 grit WEBRAX. Many expert and professional turners use much finer grit silicon carbide products. You will always get the best result by stopping the lathe and hand-sanding with the grain. This will get rid of any turning rings and let you concentrate on any "sore patches" (to quote Frank Pain)WET SANDING Some woodturners like to sand wet in a effort to get a better finish. It is messy, but has the advantage that it produces a slurry rather than harmful dry dust. If you are sensitive to dust or you are using timbers which produce irritant dust (eg Iroko) wet-sanding could be a very useful technique. The surface of the wood is kept wet all the time. This swells the surface wood fibres so they stand up - to be cut off rather more cleanly than they would be if they were sanded dry.
SANDING WITH OIL Some woodturners oil the wood liberally with Danish oil before sanding. The resulting messy slurry fills the grain as it sands as it polishes! (or at least that is the general idea) You might like to try it sometime with Jayflex.
REVERSING THE LATHE With some fluffy timbers such as poor grade mahogany it is easy to end up with the wood fibres laid over all in one direction. Wood in this condition is very resistant to sanding but the problem can be solved if you can reverse the rotation periodically and sand the other way.
Power sanding This seems like cheating to woodturners of the old school. When I used to use this method (many years ago) I kept it quiet in case others would think I wasn't a proper woodturner! I used to make my own soft faced arbors from rubber carpet underlay attached to the power drill rubber sanding disc. Power sanding is very useful to professional bowl turners trying to maximise production. It is particularly effective for grinding spalted wood to shape when cutting tools fail to achieve a clean cut surface on soft areas. Power sanding uses a sanding disc attached to a rubber arbor. The arbor is held in a flexible drive or power drill and used freehand while the workpiece rotates on the lathe. The rotating disc must be angled in such a way as to "trail" the edge of the abrasive or it may catch and tear. The discs fix onto the arbor with Velcro. Velcro backed discs are available with cloth or paper backing. The advantage is that the abrasive does not clog up because it is on the move - rotating at high speed. The sanding dust is not trapped between the abrasive and the wood, as it is when the abrasive is hand held. The cutting action is very quick and you will soon generate dense clouds of fine dust as the wood is ground into shape. Because of the extra dust it is absolutely essential to wear a respirator and/or use an efficient dust extractor. One big problem with the Velcro facing on the arbor is that it can soften with heat and lose its grip. This problem is overcome by a superior system invented by Len Piers. His "Grippa Discs" are all foam backed. The foam stops the heat getting through to the velcro and melting the little hooks. This system uses very durable cloth backed abrasive which lasts so long that the running costs are no greater than plain (non foam) disc systems. Also the foam is replaced every time a disc is replaced, so foam breakup on soft arbors is no longer a problem.