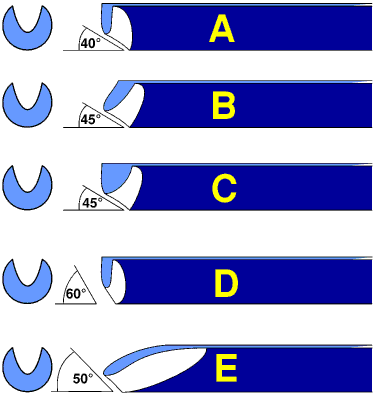
In those days (1966) gouges were all forged by hand and came in all shapes and sizes. They were all carbon steel as HSS gouges were not yet available. They had to be reground often and I used up quite a few. This is a typical section of a carbon steel forged gouge. I began to experiment with a view to making the gouge last longer between sharpenings and also cut better. I epoxy glued some high speed steel toolbits into steel shafts and ground them to various flute shapes by hand with a cutting disc.

Some years later I returned from a brief career with the Marconi Company and did some serious experimentation with gouge shapes. This is the flute section I came up with. It worked really well for me. It has a large radius at the sides blending into a small radius at the bottom of the flute.
I had a good friend with an engineering business and he was able to mill out some gouges to my design from round section material. The idea of milling gouges out of the round instead of forging was new at the time - at least it was to me. I used some Government surplus carbon steel which kept a wonderful edge. I have no idea what the analysis of the steel was to this day - it was sold to me as "tool steel". The gouges were taken to a heat treatment specialist in Harlow, Essex to be induction hardened. It was fascinating to see the process. The gouges were suspended in the middle of a coil protruding from one end of a huge box the size of bus. Inside the box were enormous glass valves generating the radio frequency power which, within a couple of seconds made the flute end of the gouge glow bright cherry red. The clamp holding the gouge was precisely controlled by a timer so that the gouge was released the moment it reached the correct temperature and it was allowed to plunge vertically into a tank of quenching liquid - soluble oil and water I think. Every gouge was hardened just right and then tempered. The next job was to take them home and clean them up and sharpen them ready for sale - we sold hundreds by mail order ("we" being Peter Child & Son). I still have a few left. Once the rust is cleaned off they keep a good edge and perform almost as well as high speed steel.
We soon progressed and made a few in high speed steel but at this point Henry Taylor Tools came into the picture. They asked to make the design in Sheffield from M2 high speed steel and they called it the "Superflute". Only Barry Martin could think of that name - something to do with keeping B sharp! The name of course has stuck and these gouges have been made in thousands ever since.

The traditional forged spindle gouges were forgotten as well, as all the makers adopted the milling process to make gouges cheaply. Now everyone makes gouges by milling them out of round section material. I am not so sure that it was such a good idea to make spindle gouges out of round but we are all used to them. The recent resurgence of the forged HSS spindle gouge shows how much better the flatter shape is. Both Henry Taylor and Robert Sorby now make some really nice forged HSS spindle gouges. But why does Robert Sorby call them the "Continental" shape?

The idea is that the large radius at the side of the flute cuts like a large gouge (say a 1/2" gouge) but if you twist it a little and cut with the small radius at the the bottom of the flute you get the same cut as you would with a small gouge (say a 1/4" gouge). As the large radius blends gradually into the small radius you can, at will, vary the radius of that bit of the edge which is in contact with the wood. You have more control over the cutting than you would have with a traditional gouge and you can achieve a higher standard of finish. The small radius at the bottom of the flute stabilises a full cut too. This makes the gouge easier to control when hollowing a bowl and easier to control at the difficult entry point at the edge of the bowl where the bevel is initially rubbing on fresh air.
